We are happy to announce the release of Qt Creator 20.0.1!
The release improves tool detection and the default session directory for chats in the AI Agent Client Protocol integration, fixes various issues with CMake Presets as well as some crashes, and contains various other improvements.
Python mobile app development reaches iOS in Qt 6.12. PySide6 developers can ship native iOS apps from the same codebase they already use for Android and desktop, with no Swift or Objective-C rewrite and no second codebase to keep in sync.
An XML injection (improper output neutralization) vulnerability in the Qt XMLQDom comment, CDATA section, and processing-instruction serialization of the Qt Framework (QtXml module) has been discovered and has been assigned the CVE id CVE-2026-15037.
An out-of-bounds read (buffer over-read) vulnerability in the QTextCodec::codecForName() function of the Qt 5 Core Compatibility APIs (the Qt5Compat module) has been discovered and has been assigned the CVE id CVE-2026-9499
Qt for MCUs 2.12.2 LTS has been released and is available for download. This patch release provides several bug fixes and other improvements while maintaining source compatibility with Qt for MCUs 2.12 (see Qt for MCUs 2.12 LTS released). This release does not add any new functionality however as part of a continuous effort to scale Qt for MCUs to more platforms new Tier-2 board Nuvoton Gerda-4L is now available.
Rust has achieved something extraordinary: it genuinely excites people to write software. But when it comes to building a real user interface, the ecosystem is still finding its footing. There are numerous options to pick your Rust UI framework from, including those gaining traction, like Iced and egui. Most of the available UI frameworks, however, are still establishing themselves in production environments and fall short in feature-richness. Qt Bridges, a bridging technology in public beta for Rust, brings something different to the table: over three decades of real-world use, commercial support, and a framework that already runs in automotive dashboards, medical devices, and industrial systems worldwide. Qt Bridge for Rust makes that maturity available to Rust developers, providing access to a UI framework that lets you keep your Rust codebase while using Qt Quick’s feature-rich UI libraries and APIs, hardware acceleration, and genuine cross-platform support.
Qt Bridges is a project we have been developing since 2025 to bring Qt’s UI framework capabilities to other programming languages, without going through the full set of bindings. The focus is on the interaction with backend data objects, seamlessly integrated as QML components in a Qt Quick interface.
Generating tests is one of the most common practical use cases for AI coding agents. However, without runtime code coverage data, an AI coding agent reasoning about test gaps must statically analyze source files and test files to infer what is likely covered. This is unreliable: the agent cannot distinguish between a function that is called indirectly through several layers and one that is never reached, nor can it detect dead code reliably.
For those who are not yet familiar with the new Qt Canvas Painter, please check the previous blog posts:Introduction,new features, andperformance measurements. This blog post introduces paths and path groups to further improve the performance.
Qt Bridges aim to bring Qt’s UI framework capabilities to commonly used programming languages, like C#, in a way that is familiar to developers using these languages. After the public Beta release, we've continued working on the C# bridge, adding new features and making improvements based on the feedback that we've received. Today we are announcing the release of a new Beta version 0.3.0, including some of these recent additions.
Learn how to start using Qt as your nextC# UI framework, try it out, and send us your feedback.
How long does it take for an Item to become visible?
Frames skipped counter in application
How long does it take for an Item that you’ve just loaded to become visible? Answering this question allows for a way to detect what some users would perceive as "frame drops". I write that in quotes because Qt Quick only draws frames when needed, meaning it doesn't drop frames; but it can show them later than one would expect. That is what we would like to identify: When components are drawn late, and by how many milliseconds or frames are they late?
I've come up with a simple solution - code below the article - on how to measure this. Items being measured must inherit a class based of QQuickItem that has a connection on QQuickItem::visibleChanged. Its visible property should be false by default. When visible becomes true, a slot will start measuring elapsed time and create a direct connection to QQuickWindow::afterFrameEnd. Once the scene graph has submitted a frame, the slot will take the measurement and disconnect the connection that triggered it to prevent further frames from triggering this event.
That alone isn't enough, however. If there were other elements on the scene being animated (say from the render thread via an Animator), those would trigger a frame swap before our item would have had a chance to be drawn, causing our measurement to be taken prematurely.
We need a way of knowing when the frame that draws our component is the one that got swapped into view. Enter QQuickItem::ensurePolished. Calling this function ensures that QQuickItem::updatePolish will be called when the scene graph is ready to render our item. We override QQuickItem::updatePolish and use it to set a flag that’ll tell us that the next frame to come be displayed will correspond to the component we’re measuring. Lastly, we read this flag during the next call to QQuickWindow::afterFrameEnd, effectively using it to trigger the elapsed time measurement only when our item is swapped onto the screen.
There is a variable amount of time between the last user interaction and the moment a frame can be rendered; because of that, a measurement in milliseconds is only accurate to the average time that it takes for one frame to be rendered immediately after the previous frame. That turns out to be 1 second divided by the display's refresh rate. We can use Qscreen::refreshRate, which gives us this value in hertz. For a 60hz display, a frame's time (T) would be 1000 ms / 60 hz ≃ 16 ms. Any time measured that is between zero and T (16 ms) would mean an instant frame swap. If we divide the measured time by T, and apply a floor function to the result, we get the number of frames dropped while making the component visible, which is a more consistent measurement than the number of milliseconds passed. For a well optimized program the output would be zero, one, or a positive integer very close to that. For more information about the rendering process, you can read scene graph and rendering from Qt's documentation.
Make C++ items visible during their instantiation, or they won’t show up on screen. This QQuickItem subclass is different from its parent in that the Item is not visible by default. We set visible to false from the C++ constructor because the order in which initial properties are evaluated and assigned in QML differs depending on the approach used to instantiate the Item and assign its initial properties. You may set the initial visible property of an item in QML to false, then make it true during its instantiation as a delegate somewhere, only for the QML Engine to optimally evaluate its initial value solely to true, causing the visibleChanged signal to never be emitted because there was, effectively, no change to the visible property. Setting the visibility to false from the constructor in C++ is a simple way to guarantee that visibleChanged will be triggered upon any initialization of the visible property in QML.
The code for the QQuickItem subclass described in this article is documented below. Hope you find it useful. Reach out to us if you need help profiling software, would like to receive our training courses, or need help developing tools such as this.
Best regards, Javier
Code
#include <QQuickItem>
#include <QQuickWindow>

class TimedItem : public QQuickItem
{
    Q_OBJECT
    QML_ELEMENT

    Q_PROPERTY(qint64 timeToDisplay READ timeToDisplay NOTIFY timeToDisplayChanged FINAL)

public:
    TimedItem(QQuickItem* parent = nullptr) : QQuickItem(parent),
              m_elapsedTimer(new QElapsedTimer())
{
    setVisible(false);
    // When made visible, measure time to display
    QObject::connect(this, &QQuickItem::visibleChanged, this, &TimedItem::startMeasuringTimeToDisplay, Qt::DirectConnection);
};

qint64 timeToDisplay() {
    return m_timeToDisplay;
};

signals:
    void timeToDisplayChanged();

private:
    void startMeasuringTimeToDisplay()
    {
        if (isVisible())
        {
            // Reset
            m_frameReady = false;
            // Attempt to take measurement after frame swaps
            QObject::connect(window(), &QQuickWindow::afterFrameEnd, this, &TimedItem::measure,
            static_cast<Qt::ConnectionType>(Qt::DirectConnection | Qt::UniqueConnection));
            // Force polish, ensuring elapsed measurement is taken on the right frame
            ensurePolished();
            // Take initial measurement
            m_elapsedTimer->start();
        }
    }

    void updatePolish()
    {
        // The frame for this component will be rendered after this
        m_frameReady = true;
    }

    void measure()
    {
        // This will be called for every frame until the right frame has been rendered
        if (m_frameReady)
        {
            // Measure elapsed time
            m_timeToDisplay = m_elapsedTimer->elapsed();
            // Prevent measuring further frame
            QObject::disconnect(window(), &QQuickWindow::afterFrameEnd, this, &TimedItem::measure);
            // Propagate measured time
            emit timeToDisplayChanged();
        }
    }

private:
    qint64 m_timeToDisplay = 0;
    QElapsedTimer *m_elapsedTimer;
    bool m_frameReady = false;
};
TL;DR: this post presents an introspectable action runtime for AI-enabled Qt applications, where selected QObject instances are exposed through a smart-object registry, translated into a bounded planning context, and mutated through previewable, validated plans. The approach relies on Qt’s existing meta-object system, using Q_PROPERTY, Q_INVOKABLE, object registration, recursive type discovery, and structured operations to keep LLM-generated actions constrained to the actual runtime object graph. The Smart Shapes QML and C++ examples show promising results with both a self-hosted qwen3-coder:30b model and OpenAI’s gpt-5.4, while also exposing practical challenges around prompt refinement, context size, multi-action requests, operations versus JavaScript fallback, and domain-specific instructions. Future work points toward larger applications, stronger validation and permissions, better context management, and possibly a generic reflective MCP server for Qt applications.
Developing AI-enabled Qt applications often starts with a deceptively simple idea: let users describe what they want, then translate that intent into concrete changes in the running application. However, moving from a natural-language prompt to safe mutations over live QObject instances is not straightforward. The application needs to decide which objects are available, what properties and methods can be used, how to represent the intended changes before applying them, and how to keep LLM-generated output constrained to the actual runtime object graph. Given that, I&aposve been working on designing an introspectable action runtime for Qt applications: selected objects are exposed through a smart-object registry, an LLM provider turns user prompts into previewable plans, and an applier executes validated operations or controlled scripts against those objects. In this article, I’ll explore how these modules work together to transform prompts into structured, introspectable, and executable actions over Qt applications.
Given this, such action runtime platform should satisfy three key requirements:
First, it must be generic and non-intrusive enough to be applied to a wide range of Qt applications, regardless of whether the UI is implemented with Qt Widgets, Qt Quick, or a combination of both. This means the infrastructure should rely on Qt’s existing object model, meta-object information, properties, methods, and object ownership rules, instead of requiring application-specific adapters for every use case.
Second, it must be accurate when translating a user prompt into effective application behavior: natural-language requests should be converted into explicit, previewable, and validated plans that only reference exposed objects and supported operations.
Finally, performance should remain a first-class concern. The planning context sent to the provider must be rich enough to avoid ambiguous actions, but compact enough to keep latency under control, avoid unnecessary traversal of large object hierarchies, and preserve UI responsiveness while plans are generated and applied.
Architecture Overview
Figure 1 presents the major components of our introspectable action runtime platform.
Figure 1:main components of Qt Instrospectable Action Runtime platform
QSmartObjectRegistry is the bridge to the live Qt object graph. It exposes selected QObject instances, assigns stable references, and describes classes, properties, methods, and collections. QSmartObjectPlanner turns a prompt into a bounded planning context. It combines the user command with registry metadata, sends that context to a provider, and converts the response into a validated QSmartObjectPlan. QSmartObjectProvider is the AI backend abstraction. QLLMSmartObjectProvider is the concrete HTTP implementation, supporting OpenAI-compatible and Ollama-style chat endpoints. QSmartObjectPlan is the previewable contract between planning and execution. It stores the summary, confidence, issues, mode, structured operations, or fallback script. QSmartObjectApplier executes accepted plans. It either applies structured operations directly through Qt meta-object APIs or runs script fallback through QJSEngine. QSmartObjectExecution reports the final outcome, including success state, summary, errors, and script console output.
For an application to be endowed with an intelligent prompt, its relevant runtime state and behavior must be made visible through Qt’s meta-object system. In practice, this means modeling the objects that the prompt should control as QObject-derived classes, exposing editable state as Q_PROPERTY, and exposing safe actions as Q_INVOKABLE methods or slots (many Qt application are already implemented as such). Properties define what the system can inspect and mutate, while invokable functions define the operations that can be requested explicitly by the user. This is an important constraint: the prompt should not operate over arbitrary implementation details, but over a deliberate application surface that the developer decided to expose. The better this surface is named, typed, and organized, the more accurately a natural-language request can be translated into an effective application action.
Object registration and type discovery build on that exposed surface. The application registers selected live objects with QSmartObjectRegistry, optionally giving them stable semantic identifiers and human-readable labels. From there, the registry assigns internal references to these objects and uses Qt meta-object introspection to discover their readable and writable properties, invokable methods, class names, and QObject-based collections. This metadata becomes the planning context consumed by QSmartObjectPlanner: it tells the provider which objects exist, which types can be created or modified, and which operations are actually legal. In other words, registration selects the live objects that participate in prompting, while type discovery describes what the prompt is allowed to do with them.
Type discovery follows the QObject surface exposed by the application. Starting from the objects registered in QSmartObjectRegistry, the implementation inspects their meta-objects and recursively discovers QObject-derived types referenced by Q_PROPERTY declarations, including direct QObject* properties and supported QObject collections such as QObjectList or QList<T>. It also walks readable runtime property values to find live child objects and collection items, so the planning context can include not only the explicitly registered object, but also the relevant object graph reachable from it. This keeps discovery aligned with Qt’s meta-object system: arbitrary C++ implementation details remain hidden, while declared properties, invokable methods, and QObject relationships become available for planning. This enables registering central components, such as a Core object, which can end up registering all important objects in the application, such as controllers. Of course, developers can also define a more limited exposure model by individually registering only the desired objects or by turning off recursive type discovery.
Prompt Engineering
One of the main challenges in this approach is that a fully generic prompt can describe the mechanics of object discovery, planning, validation, and execution, but it cannot always capture the application’s domain semantics. The same property names and methods may have different meanings depending on the example, and some user requests require contextual rules that are not obvious from the meta-object data alone. For this reason, the generic smart-object prompt may be complemented by example-specific instructions. These instructions explain how the exposed objects should be interpreted in that particular application, which coordinate system is being used, how collections should be handled, which operations are preferred, and how ambiguous commands should be resolved. In practice, the generic prompt provides the execution contract, while the example-specific prompt gives the model the domain knowledge needed to produce accurate plans.
These are the most important fragments of currently adopted generic prompt:
You translate natural-language editing requests into a smart-object mutation plan. Return only a JSON object. Do not wrap it in markdown. The JSON object contains either structured operations or a JavaScript script that will run against live QObject wrappers. The planning context contains two authoritative sections: availableClasses and instances. Use availableClasses as an exhaustive class catalog for all exposed objects and QObject-derived member types, and instances for live objects, aliases, and collection membership. Prefer operations mode. Use script mode only when the request cannot be represented with the supported operation vocabulary.
...
Supported operations are setProperty, adjustProperty, callMethod, createObject, and destroyObject. Operation targets are direct object refs, created ids, or collection selections. Collection sources can use ownerRef for one owner, owner for a target resolving to one owner, or owners for a target resolving to many owners, including nested selection targets.
...
For setProperty and adjustProperty, the property field must exactly match a writable property listed in availableClasses for the target object&aposs class. For collection predicates, the predicate property must exactly match a readable property listed in availableClasses for the collection item class.
...
Treat the planning context as authoritative. Do not invent members that are not explicitly listed there.
...
If the request cannot be satisfied with the available classes, objects, properties, methods, or collection relations, do not approximate it. Return confidence 0.0, at least one issue, empty operations, and an empty script.
...
The result must have this structure: {"summary":"short summary","confidence":0.0,"issues":["optional issue"],"mode":"operations","operations":[{"op":"setProperty","target": {"type":"object","ref":"registry-ref"},"property":"propertyName","value":"value"}],"script":""}
...
For script fallback, set mode to script, operations to [], and script to the JavaScript statements. If the request is ambiguous, return an issue and the safest minimal plan.
Example Application
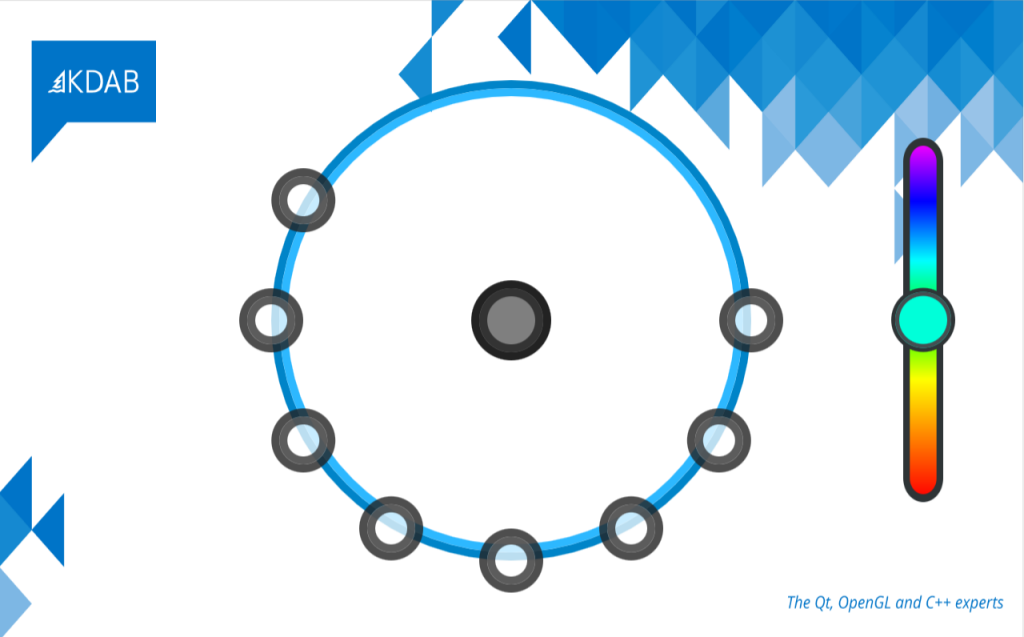
The current implementation includes both QML and C++ examples built around the same shape-editing scenario. In the QML example, the application uses the QtActionRuntime.SmartObjects QML API directly: shapes are created in a Qt Quick scene, exposed through SmartObjectRegistry, and controlled through LLMSmartObjectProvider, SmartObjectPlanner, and SmartObjectApplier objects declared from QML. The C++ example implements the same workflow with a Qt Widgets interface and a SmartObjectsDemoController, wiring the registry, provider, planner, and applier from C++ and reflecting the generated plan back into the UI before it is applied. Both examples expose shape objects with properties such as position, size, color, and type, then allow prompts like moving a circle or changing its color to be translated into validated smart-object plans, as described in Figure 2.
We tested the Smart Shapes example with both a self-hosted Ollama backend running qwen3-coder:30b and OpenAI’s gpt-5.4 model, and both produced good results for a range of natural-language commands. The prompts covered simple creation and editing requests, such as “create a new yellow circle”, “rename the yellow circle to myCircle”, and “move myCircle to the right of rectangleOne”, as well as destructive and spatial operations like “remove the red circle” and “arrange all circles evenly around rectangleOne, using a radius of 200 and the rectangle’s center as the arrangement center”. These tests helped validate that the exposed object model, generated planning context, and structured operation format were expressive enough for both local and hosted models to translate user intent into effective changes in the scene.
0:00
/0:13
Video 1:results for prompt "create a new yellow circle and a new purple circle in different positions"
The next step was to investigate object collection traversal and object discovery in more complex object graphs. The Smart Shapes example already exercises a simple collection through the scene’s list of shapes, but real applications usually expose deeper hierarchies: controllers own models, models expose collections, and collection items may reference other domain objects. The goal is to verify how well the planner can discover these relationships from registered root objects, follow QObject-valued properties and supported collections, and still generate accurate operations without requiring every object to be registered manually.
0:00
/0:13
Video 2:results for prompt "change yellow circle&aposs id to myCircle and position it to the right of circleTwo"
No example-specific instructions were required, so far, for this example because the exposed QObject properties and invokable methods already provided enough semantic information for the planner to generate accurate operations.
Next, we want to try prompts involving multiple objects and multiple actions in a single request. Simple commands are useful to validate the basic planning pipeline, but real user interaction will often combine several intentions at once, such as creating an object, positioning it relative to another one, changing its visual attributes, and updating its identifier in the same prompt. These scenarios are important because they test whether the planner can decompose a compound request into a complete sequence of operations, preserve the correct order of execution, and avoid summarizing changes that were not actually represented in the generated plan. At this point, qwen3-coder:30b occasionally started producing incorrect plans, while gpt-5.4 performed quite well.
0:00
/0:13
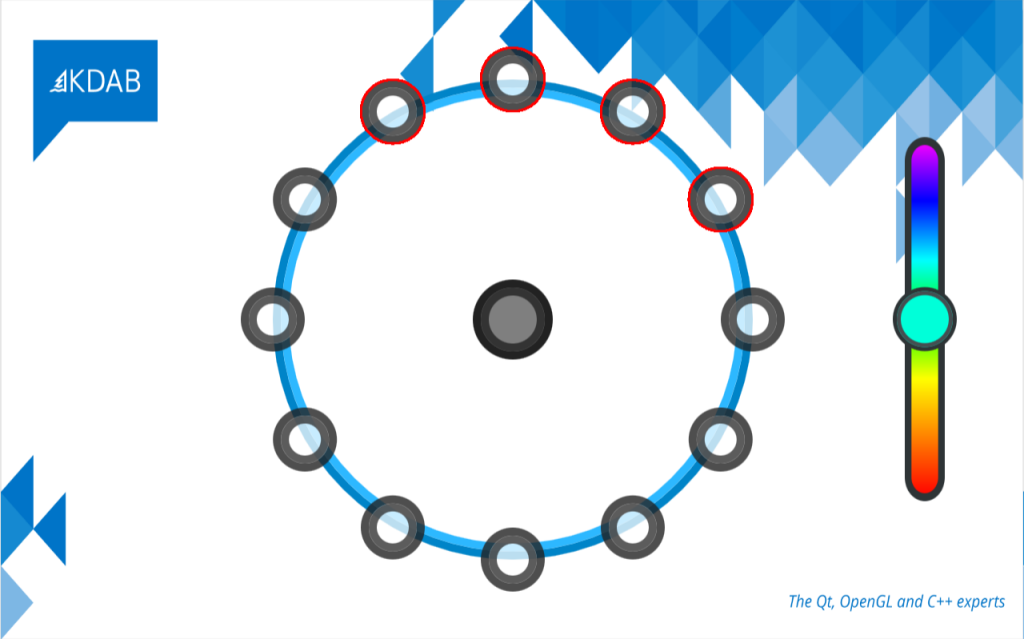
Video 3:results for prompt "move rectangleOne to (200, 200) and position all circles evenly distributed around the angles of a circle centered at rectangleOne and with a radius of 150"
Notice that the circles are not actually distributed around rectangleOne’s center. This happens because gpt-5.4 has no way to infer how shape centers are computed from the exposed properties alone. The issue was easily fixed by adding example-specific planning instructions, such as: “In this shape demo, x and y are top-left coordinates. Object centers are computed as (x + width / 2, y + height / 2)”.
Challenges and Future Work
The implementation also showed that the hard part is not simply calling an LLM, but defining a stable contract between the model and the Qt object graph. The implementation moved from an initial JavaScript-oriented approach to an “operations first, JavaScript after” architecture, then added asynchronous plan generation, cancellation, richer registry metadata, collection predicates, runtime property values, and several rounds of prompt refinement. Prompt design became a central concern because the model must not invent properties, confuse planning metadata with writable object properties, skip parts of multi-action requests, or summarize mutations that were not actually emitted.
Context window sizing is another practical issue: the planning context must include enough classes, instances, collection relations, and runtime values to make accurate decisions, but not so much that local models lose reliability or exceed their useful context. The operations mode gives a safer and more introspectable path for common mutations such as setting properties, calling methods, creating objects, destroying objects, and selecting collection items. JavaScript remains useful as a fallback, but it is harder to validate and has a larger execution surface. Other important challenges include handling provider differences between Ollama-style and OpenAI-compatible endpoints, validating JSON responses, resolving object references safely, and deciding how much of the live object graph should be exposed to the prompt.
A natural direction for future work is to package this infrastructure as a generic reflective MCP server for Qt applications. Instead of each application embedding its own prompt-to-object bridge, a Qt MCP layer could expose selected QObject instances, properties, invokable methods, object collections, and runtime state through a standard protocol, allowing external agents to inspect and operate on live Qt applications in a controlled way. Beyond that, there are several interesting extensions: better permission models for deciding which objects and operations are visible, richer schema generation for enums and value types, configurable recursive discovery policies, stronger plan validation before execution, undo/redo integration, transaction support for multi-step plans, visual plan previews, and model-independent test suites for comparing local and hosted providers.
Another promising direction is to improve context management, so large applications can expose only the subset of the object graph relevant to a given prompt while still preserving enough semantic information for accurate planning.
Last but not least, this solution must be tested in larger and more complex applications. The Smart Shapes example is useful because it makes the core ideas easy to see, but real Qt applications have deeper object graphs, richer domain rules, long-lived controllers, asynchronous operations, permissions, and state that changes while the user is interacting with the system. Those are the scenarios that will really test whether reflective discovery, bounded planning contexts, structured operations, and fallback scripting can scale beyond a controlled demo. If this approach continues to work there, it opens an interesting path: Qt applications that can expose their own runtime capabilities and let users interact with them through intent, not just through predefined UI controls. What about including API documentation, in a Retrieval-Augmented Generation (RAG)-like approach?
That’s all for now. Lots of fun happening over here. 😉
Controller objects have been the main way to glue your QML UI to your application's actual implementation of the I/O and business logic. However, over the years, the way to actually expose that controller object has changed. And now, we contributed a change in QQmlEngine that allows you to change it once again, and we believe: for the better.
What are "controllers" anyway?
Conceptually, controllers are a thin glue layer between your business logic and your QML, exposing the data that the GUI needs in a format it can easily use. They are implemented as QObject-derived instances, usually with properties exposing values that may or may not be writable, as well as potentially some Q_INVOKABLE methods that can be triggered by the QML and maybe some signals.
Usually, these controllers are specific to a single logical group of values and functions within the wider application. An application may have a hand-full to dozens of them for a big system. Models exposing collections of data are usually made available as read-only properties returning a QAbstractItemModel-derived data model on these controllers.
Often, these controllers need to be instantiated with some initialization, as they need references to the business-logic objects they expose to the GUI, listen for signals to get notifications of changes, etc. And that's where the trouble starts...
Pre-Qt 6
Context properties
In the early days of QML, one would often use controller instances exposed to QML as context properties. Doing that allowed one to instantiate the controllers under control of C++, giving it all the references the objects needed at that time. We would often expose them to QML using a naming pattern like starting the name with a double underscore __someController so that it was easy to recognize in the QML code. Using context properties however is no longer recommended. Their lookup is slow, and the QML compilers cannot reason about them, so code using them cannot be optimized. Nor is tooling available to help the QML programmer, as code completion and the likes are not possible.
Singleton Instances
Then came the qmlRegisterSingletonInstance method. This method allowed one to register a QML singleton, but it would return the instance that you passed it as an argument and that you could instantiate however you needed. That was a good solution, but it didn't have a long useful life as it didn't mesh well with the declarative registration and it had issues with the one instance being the instance for every QML engine in your application (if you had more than one).
Post-Qt 6
Since Qt 6, the recommended way to write QML is to create QML modules using declarative registration for C++-based objects. That has many benefits in terms of tooling and optimization, so it's good practice to do this. But it also meant that since Qt 6, one could no longer mix-and match imperative registration with declarative: you either used the one, or the other; which rendered the qmlRegisterSingletonInstance method above useless.
There are many possible approaches that I have seen being applied to still control the creation of controller objects, usually by registering a singleton that has a static create factory function and returning some C++ singletons there or something along those lines. That works, but isn't very elegant. An alternative approach is using initial properties on the root object, but that either requires accessessing the root id from other QML files or propagating the controllers all the way down the stack of items. Neither is a great solution for different reasons. My colleague Javier Cordero Pérez is making a couple of videos about ways to do this, so I won't go into detail here. These videos will be added here once they have been released.
New approach
That building this connection between C++ and QML was so inelegant - despite being so important - inspired me to finally take matters into my own hands and write a patch.
The result is available starting with Qt 6.12 onward and it combines the good things of qmlRegisterSingletonInstance and the declarative registration: you still register your controller type as a QML singleton so that the type is fully known by the tooling and access to it can be optimized. But we gain back the ability to provide a ready-made instance to the QML engine.
setExternalSingletonInstance
The API on QQmlEngine gained a single new method: QQmlEngine::setExternalSingletonInstance. It allows you to provide an instance of a type declared as a singleton as the instance to use in any QML running in that engine, just like you could with qmlRegisterSingletonInstance. In contrast to that old registration function, however, you call this method on your specific QQmlEngine instance. Note that the type has to be (declaratively) registered as a singleton type for this call to work. If you are using more than one engine, it is up to you to decide if you want to provide the same instance to these different engines, or have separate instances.
This simple method gives you back an elegant, supported way to fully control the instantiation of the QML singleton, and thus easily connect it to your business logic or whatever else you need to with it. However, it is up to you make sure that you do this call before any QML code actually tries to access the singleton. Otherwise, the engine will (try to) create it's own instance as it used to. You cannot replace an already existing singleton instance, so once there is one, it is the one.
It’s up to you to make sure that the provided singleton instance outlives the QML that depends on it. You can do that in any way that works in your context, but you could consider parenting the instance to the QQmlEngine instance, ordering the variables containing them on the stack correctly, or using QQmlEngine::setObjectOwnership to hand ownership of the singleton to the QML engine.
QML_UNCREATABLE for singletons
If you are providing your QML singleton instance yourself anyway, you logically also don't need it to be creatable by the engine either - although, it still can be, of course. If your controller type has a non-default constructor - perhaps to take in some references to your business logic instances - you can now mark your singleton with QML_UNCREATABLE, just like you can with other QML types. If you do that, you no longer need to supply a factory function (and even if you do, it won't be used).
Of course, if you mark a singleton as uncreatable, it is up to you to make sure you actually supply an instance via QQmlEngine::setExternalSingletonInstance before the singleton is needed from QML.
Hotspot is a standalone GUI designed to provide a user-friendly interface for analyzing performance data. It takes a perf.data file, parses and evaluates its contents, and presents the results in a visually appealing and easily understandable manner. Hotspot’s goal is to offer a modern alternative to perf report, making performance analysis on Linux systems more intuitive and efficient.
Version 1.6.0 introduces powerful new features, improved workflows, and numerous bug fixes to make profiling even smoother.
ChangeLog for Hotspot v1.6.0
This release focuses on usability improvements and extended analysis capabilities. The most notable additions are:
Support for archived perf files (e.g. perf.data.zip)
Regex filtering in the flamegraph
Tracepoint support
Various bug fixes and stability improvements
Open Archived perf Files Directly
Hotspot can now open perf recordings stored inside archives such as perf.data.zip.
This simplifies sharing profiling results, storing CI artifacts, and working with compressed recordings - no manual extraction required.
Regex in the Flamegraph
The Flamegraph view now supports regular expression filtering.
This makes it much easier to:
Match complex symbol patterns
Focus on specific subsystems or namespaces
Quickly narrow down large profiling datasets
Especially for large C++ codebases, regex search significantly speeds up navigation.
Regex in the flamegraph
Tracepoint Support
Hotspot 1.6.0 introduces support for tracepoints captured via perf.
This enables analysis of event-based data in addition to traditional sampling, giving deeper insight into system and runtime behavior.
Tracepoints
Bug Fixes and Improvements
As usual, this release also includes numerous smaller fixes, UI refinements, and internal cleanups to improve overall stability and user experience.
For a complete overview of all changes, see the full changelog on GitHub.
Automating Repetitive GUI Interactions in Embedded Development with Spix
As Embedded Software Developers, we all know the pain: you make a code change, rebuild your project, restart the application - and then spend precious seconds repeating the same five clicks just to reach the screen you want to test. Add a login dialog on top of it, and suddenly those seconds turn into minutes. Multiply that by a hundred iterations per day, and it’s clear: this workflow is frustrating, error-prone, and a waste of valuable development time.
In this article, we’ll look at how to automate these repetitive steps using Spix, an open-source tool for GUI automation in Qt/QML applications. We’ll cover setup, usage scenarios, and how Spix can be integrated into your workflow to save hours of clicking, typing, and waiting.
The Problem: Click Fatigue in GUI Testing
Imagine this:
You start your application.
The login screen appears.
You enter your username and password.
You click "Login".
Only then do you finally reach the UI where you can verify whether your code changes worked.
This is fine the first few times - but if you’re doing it 100+ times a day, it becomes a serious bottleneck. While features like hot reload can help in some cases, they aren’t always applicable - especially when structural changes are involved or when you must work with "real" production data.
So, what’s the alternative?
The Solution: Automating GUI Input with Spix
Spix allows you to control your Qt/QML applications programmatically. Using scripts (typically Python), you can automatically:
Insert text into input fields
Click buttons
Wait for UI elements to appear
Take and compare screenshots
This means you can automate login steps, set up UI states consistently, and even extend your CI pipeline with visual testing. Unlike manual hot reload tweaks or hardcoding start screens, Spix provides an external, scriptable solution without altering your application logic.
Setting up Spix in Your Project
Getting Spix integrated requires a few straightforward steps:
1. Add Spix as a dependency
Typically done via a Git submodule into your project’s third-party folder.
Include the 2 Spix Headers (AnyRPCServer for Communication and QtQmlBot)
Start the Spix RPC server.
Create a Spix::QtQmlBot.
Run the test server on a specified port (e.g. 9000).
#include <Spix/AnyRpcServer.h>
#include <Spix/QtQmlBot.h>
[...]

//Start the actual Runner/Server
spix::AnyRpcServer server;
auto bot = new spix::QtQmlBot();
bot->runTestServer(server);
At this point, your application is "Spix-enabled". You can verify this by checking for the open port (e.g. localhost:9000).
Spix can be a Security Risk: Make sure to not expose Spix in any production environment, maybe only enable it for your Debug-builds.
Where Spix Shines
Once the setup is done, Spix can be used to automate repetitive tasks. Let’s look at two particularly useful examples:
1. Automating Logins with a Python Script
Instead of typing your credentials and clicking "Login" manually, you can write a simple Python script that:
Connects to the Spix server on localhost:9000
Inputs text into the userField and passwordField
Clicks the "Login" button (Items marked with "Quotes" are literal That-Specific-Text-Identifiers for Spix)
When executed, this script takes care of the entire login flow - no typing, no clicking, no wasted time. Better yet, you can check the script into your repository, so your whole team can reuse it.
For Development, Integration in Qt-Creator can be achieved with a Custom startup executable, that also starts this python script.
In a CI environment, this approach is particularly powerful, since you can ensure every test run starts from a clean state without relying on manual navigation.
2. Screenshot Comparison
Beyond input automation, Spix also supports taking screenshots. Combined with Python libraries like OpenCV or scikit-image, this opens up interesting possibilities for testing.
Example 1: Full-screen comparison
Take a screenshot of the main window and store it first:
from skimage import io
from skimage.metrics import structural_similarity as ssim

screenshot1 = io.imread('/tmp/reference.png', as_gray=True)
screenshot2 = io.imread('/tmp/screenshot.png', as_gray=True)

ssim_index = ssim(screenshot1, screenshot2, data_range=screenshot1.max() - screenshot1.min())

threshold = 0.95

if ssim_index == 1.0:
    print("The screenshots are a perfect match")
elif ssim_index >= threshold:
    print("The screenshots are similar, similarity: " + str(ssim_index * 100) + "%")
else:
    print("The screenshots are not similar at all, similarity: " + str(ssim_index * 100) + "%")
This is useful for catching unexpected regressions in visual layout.
Example 2: Finding differences in the same UI
Use OpenCV to highlight pixel-level differences between two screenshots—for instance, missing or misaligned elements:
import cv2

image1 = cv2.imread('/tmp/reference.png')
image2 = cv2.imread('/tmp/screenshot.png')

diff = cv2.absdiff(image1, image2)

# Convert the difference image to grayscale
gray = cv2.cvtColor(diff, cv2.COLOR_BGR2GRAY)

# Threshold the grayscale image to get a binary image
_, thresh = cv2.threshold(gray, 30, 255, cv2.THRESH_BINARY)

contours, _ = cv2.findContours(thresh, cv2.RETR_EXTERNAL, cv2.CHAIN_APPROX_SIMPLE)
cv2.drawContours(image1, contours, -1, (0, 0, 255), 2)

cv2.imshow('Difference Image', image1)
cv2.waitKey(0)
This form of visual regression testing can be integrated into your CI system. If the UI changes unintentionally, Spix can detect it and trigger an alert.
Defective Image
The script marked the defective parts of the image compared to the should-be image.
Recap
Spix is not a full-blown GUI testing framework like Squish, but it fills a useful niche for embedded developers who want to:
Save time on repetitive input (like logins).
Share reproducible setup scripts with colleagues.
Perform lightweight visual regression testing in CI.
Interact with their applications on embedded devices remotely.
While there are limitations (e.g. manual wait times, lack of deep synchronization with UI states), Spix provides a powerful and flexible way to automate everyday development tasks - without having to alter your application logic.
If you’re tired of clicking the same buttons all day, give Spix a try. It might just save you hours of time and frustration in your embedded development workflow.
Ever since C++20 introduced coroutine support, I was wondering how this could integrate with Qt. Apparently I wasn’t the only one: before long, QCoro popped up. A really cool library! But it doesn’t use the existing future and promise types in Qt; instead it introduces its own types and mechanisms to support coroutines. I kept wondering why no-one just made QFuture and QPromise compatible – it would certainly be a more lightweight wrapper then.
With a recent project at work being a gargantuan mess of QFuture::then() continuations (ever tried async looping constructs with continuations only? ) I had enough of a reason to finally sit down and implement this myself. The result: https://gitlab.com/pumphaus/qawaitablefuture.
It looks a lot like what you’d write with QCoro, but it all fits in a single header and uses native QFuture features to – for example – connect to a signal. It’s really just syntax sugar around QFuture::then(). Well, that, and a bit of effort to propagate cancellation and exceptions. Cancellation propagation works both ways: if you co_await a canceled QFuture, the “outer” QFuture of coroutine will be canceled as well. If you cancelChain() a suspended coroutine-backed QFuture, cancellation will be propagated into the currently awaited QFuture.
What’s especially neat: You can configure where your coroutine will be resumed with co_await continueOn(...). It supports the same arguments as QFuture::then(), so for example:
QFuture<void> SomeClass::someMember()
{
    co_await QAwaitableFuture::continueOn(this);
    co_await someLongRunningProcess();
    // Due to continueOn(this), if "this" is destroyed during someLongRunningProcess(),
    // the coroutine will be destroyed after the suspension point (-> outer QFuture will be canceled)
    // and you won't access a dangling reference here.
    co_return this->frobnicate();
}

QFuture<int> multithreadedProcess()
{
    co_await QAwaitableFuture::continueOn(QtFuture::Launch::Async);

    double result1 = co_await foo();
    // resumes on a free thread in the thread pool
    process(result1);

    double result2 = co_await bar(result1);
    // resumes on a free thread in the thread pool
    double result3 = transmogrify(result2);

    co_return co_await baz(result3);
}
Also, if you want to check the canceled flag or report progress, you can access the actual QPromise that’s backing the coroutine:
QFuture<int> heavyComputation()
{
    QPromise<int> &promise = co_await QAwaitableFuture::promise();
    promise.setProgressRange(0, 100);

    double result = 0;

    for (int i = 0; i < 100; ++i) {
        promise.setProgressValue(i);
        if (promise.isCanceled()) {
            co_return result;
        }
        frobnicationStep(&result, i);
    }
    co_return result;
}
Outlook
I’m looking to upstream this. It’s too late for Qt 6.11 (already in feature freeze), but maybe 6.12? There have been some proposals for coroutine support on Qt’s Gerrit already, but none made it past the proof-of-concept stage. Hopefully this one will make it. Let’s see.
Otherwise, just use the single header from the qawaitablefuture repo. It an be included as a git submodule, or you just vendor the header as-is.
Happy hacking!
Caveat: GCC < 13
There was a nasty bug in GCC’s coroutine support: https://gcc.gnu.org/bugzilla/show_bug.cgi?id=101367 It affects all GCC versions before 13.0.0 and effectively prevents you from writing co_await foo([&] { ... }); – i.e. you cannot await an expression involving a temporary lambda. You can rewrite this out as auto f = foo([&] { ... }); co_await f; and it will work. But there’s no warning at compile time. As soon as the lambda with captures is a temporary expression inside the co_await, it will crash and burn at runtime. Fixed with GCC13+, but took me a while to figure out why things went haywire on Ubuntu 22.04 (defaults to GCC11).
Thinking about compiling Qt on Linux? Discover why developers build it themselves, and what you should know before diving into source, modules and configuration.
This post describes an experiment using Qt 6.7’s REST APIs to explore Stripe’s payment model, and what I learned building a small desktop developer tool.
Recent Qt releases have included several conveniences for developing clients of remote REST APIs. I recently tried it out with the Stripe payments REST API to get to grips with the Qt REST API in the real world. The overloading of the term API is unhelpful, I find, but hopefully not too confusing here.
As with almost everything I try out, I created Qt desktop tooling as a developer aid to exploring the Stripe API and its behavior. Naming things is hard, but given that I want to put a “Q” in the name, googling “cute stripes” gives lots of hits about fashion, and the other too-obvious-to-say pun, I’ve pushed it to GitHub as “Qashmere“:
setAlternatingRowColors(true);
Developers using REST APIs will generally be familiar with existing tooling such as Postman and Bruno, for synthesizing calls to collections of REST APIs. Indeed, Qashmere uses the Stripe Postman JSON definition to present the collection of APIs and parameters. Such tools have scripting interfaces and state to create workflows that a client of the REST API needs to support, like “create a payment, get the id of the payment back from the REST API and then cancel the payment with the id”, or “create a payment, get the id of the payment back from the REST API and then confirm it by id with a given credit card”.
So why create Qashmere? In addition to REST APIs, Stripe maintains objects which change state over time. The objects remain at REST until acted on by an external force, and when such an action happens a notification is sent to clients about those state changes, giving them a chance to react. I wanted to be able to collect the REST requests/responses and the notified events and present them as they relate to the Stripe objects. Postman doesn’t know about events or about Stripe objects in particular, except that it is possible to write a script in Postman to extract the object which is part of a JSON payload. Postman also doesn’t know that if a Payment Intent is created, there are a subset of next steps which could be in a workflow, such as cancel, capture or confirm payment etc.
Something that I discovered in the course of trying this out is that when I confirm a Payment Intent, a new Charge object is created and sent to me with the event notification system. Experimental experiences like that help build intuition.
Stripe operates with real money, but it also provides for sandboxes where synthetic payments, customers etc can be created and processed with synthetic payment methods and cards. As Qashmere is only useful as a developer tool or learning aid, it only works with Stripe sandboxes.
Events from Stripe are sent to pre-configured web servers owned by the client. The web servers need to have a public IP address, which is obviously not appropriate for a desktop application. A WebSocket API would be more suitable and indeed the stripe cli tool uses a WebSocket to receive events, but the WebSocket protocol is not documented or stable. Luckily the stripe cli tool can be used to relay events to another HTTP server, so Qashmere runs a QHttpServer for that purpose.
Implementation with Qt REST API
The QRestReply wraps a QNetworkReply pointer and provides convenience API for accessing the HTTP return code and for creating a QJsonDocument from the body of the response. It must be created manually if using QNetworkAccessManager directly. However the new QRestAccessManager wraps a QNetworkAccessManager pointer, again to provide convenience APIs and overloads for making requests that are needed in REST APIs (though some less common verbs like OPTIONS and TRACE are not built-in). The QRestAccessManager has conveniences like overloads that provide a way to supply callbacks which already take the QRestReply wrapper object as a parameter. If using a QJsonDocument request overload, the “application/json” Content-Type is automatically set in the header.
One of the inconveniences of QRestAccessManager is that in Qashmere I use an external definition of the REST API from the Postman definition which includes the HTTP method. Because the QRestAccessManager provides strongly typed API for making requests I need to do something like:
There is a sendCustomRequest class API which can be used with a string, but it does not have an overload for QJsonDocument, so the convenience of having the Content-Type header set is lost. This may be an oversight in the QRestAccessManager API.
Another missing feature is URL parameter interpolation. Many REST APIs are described as something like /v1/object/:object_id/cancel, and it would be convenient to have a safe way to interpolate the parameters into the URL, such as:
QUrl result = QRestAccessManager::interpolatePathParameters(
This is needed to avoid bugs such as a user-supplied parameter containing a slash for example.
Coding Con Currency
In recent years I’ve been writing and reading more Typescript/Angular code which consumes REST services, and less C++. I’ve enjoyed the way Promises work in that environment, allowing sequences of REST requests, for example, to be easy to write and read. A test of a pseudo API could await on requests to complete and invoke the next one with something like:
The availability of async functions and the Promise to await on make a test like this quite easy to write, and the in-application use of the API uses the same Promises, so there is little friction between application code and test code.
I wanted to see if I can recreate something like that based on the Qt networking APIs. I briefly tried using C++20 coroutines because they would allow a style closer to async/await, but the integration friction with existing Qt types was higher than I wanted for an experiment.
Using the methods in QtFuture however, we already have a way to create objects representing the response from a REST API. The result is similar to the Typescript example, but with different ergonomics, using .then instead of the async and await keywords.
throw std::runtime_error("Failed to read response");
}
RestResponse response;
response.jsonDoc = *responseDoc;
response.statusCode = restReply.httpStatus();
response.error = restReply.error();
response.headers = reply->headers();
response.url = reply->url();
return response;
}
);
}
The QRestAccessManager API requires the creation of a dummy response function when creating a custom request because it is not really designed to be used this way. The result is an API accepting a request and returning a QFuture with the QJsonDocument content. While it is possible for a REST endpoint to return something else, we can follow the Qt philosophy of making the most expected case as easy as possible, while leaving most of the rest possible another way. This utility makes writing unit tests relatively straightforward too:
The result is quite similar to the Typescript above, but only because we can use spy.wait. In application code, we still need to use .then with a callback, but we can additionally use .onFailed and .onCanceled instead of making multiple signal/slot connections.
With the addition of QtFuture::whenAll, it is easy to make multiple REST requests at once and react when they are all finished, so perhaps something else has been gained too, compared to a signal/slot model:
auto houndList = four_responses[3].jsonDoc.object()["message"].toArray();
QCOMPARE_GE(houndList.size(), 7);
QVERIFY(houndList.contains("afghan"));
QVERIFY(houndList.contains("basset"));
QVERIFY(houndList.contains("blood"));
QVERIFY(houndList.contains("english"));
QVERIFY(houndList.contains("ibizan"));
QVERIFY(houndList.contains("plott"));
QVERIFY(houndList.contains("walker"));
setAutoDeleteReplies(false);
I attempted to use new API additions in recent Qt 6 versions to interact with a few real-world REST services. The additions are valuable, but it seems that there are a few places where improvements might be possible. My attempt to make the API feel closer to what developers in other environments might be accustomed to had some success, but I’m not sure QFuture is really intended to be used this way.

      Do readers have any feedback? Would using QCoro improve the coroutine experience? Is it very unusual to create an application with QWidgets instead of QML these days? Should I have used PyQt and the python networking APIs?
One of the most tedious tasks a developer will do is debugging a nagging bug. It's worse when it's a web app, and even worse when its a webassembly web app.
The easiest way to debug Qt Webassembly is by configuring using the -g argument, or CMAKE_BUILD_TYPE=Debug . Emscripten embeds DWARF symbols in the wasm binaries.
NOTE: Debugging wasm files with DWARF works only in the Chrome browser with the help of a browser extension.
C/C++ DevTools Support (DWARF) browser extension. If you are using Safari or Firefox, or do not want to or cannot install a browser extension, you will need to generate source maps, which I will look at in my next blog post.
DWARF debugging
You need to also enable DWARF in the browser developer tools settings, but you do not need symlinks to the source directories, as you would need to using source maps, as the binaries are embedded with the full directory path. Like magic!
Emscripten embeds DWARF symbols into the binaries built with -g by default, so re-building Qt or your application in debug mode is all you need to do.
Qt builds debug libraries by default using the optimized argument -g2, which produces less debugging info, but results in faster link times. To preserve debug symbols you need to build Qt debug using the -g or -g3 argument. Both of these do the same thing.
Using DWARF debugger
Open Chome with the extention mentioned before installed, and open the console tools. Navigate to the Qt for WebAssembly web application you need to debug. Once it opens, it may take a few seconds for all the symbols and files to get parsed. If you are debugging into Qt, this will take quite a few seconds - just keep waiting.
The javascript console will soon contain file source file paths and sources. You can find your file to debug, and set breakpoints. Just reload the page and once it hits a breakpoint, it will stop execution and highlight the current line in the source view. It also will show variable names and values.
You can then step though your code as you would debugging a desktop application.
In a recent series of blog posts, we have demonstrated that Python and Qt fit together very well. Due to its accessibility, ease-of-use and third-party ecosystem, it is really straightforward to prototype and productize applications. Still, Python has one significant disadvantage: It is not necessarily the most performant programming language.
The Qt Speech module was introduced in Qt 5.8.0. I made a blog post at that time (June 2017), looking at how it provided cross-platform support for text-to-speech. With the Qt 6.0.0 release, Qt Speech was one of the modules that were no longer available. In the upcoming Qt 6.4.0 release, it is again going to be part of Qt.
On November 13, the Qt and QML community will meet in Vienna for a full day of inspiring talks, networking and knowledge sharing.
Join developers, tech leads and companies for a day full of insights, real world experiences and community exchange. Free to attend, but seats are limited - first come, first serve!Read on for all the details:
In this blog post, we’re having a look at how we added support for custom server certificates to Qt WebEngine. This way an application can talk to a server using a self-signed TLS certificate without adding it to the system-wide certificate store.
The Felgo 4.3.0 update adds many new features and improvements for Felgo QML Hot Reload.The release also updates to Qt 6.8.3, Android 15 Support, andQt Creator 17. Read on to learn more about the release.


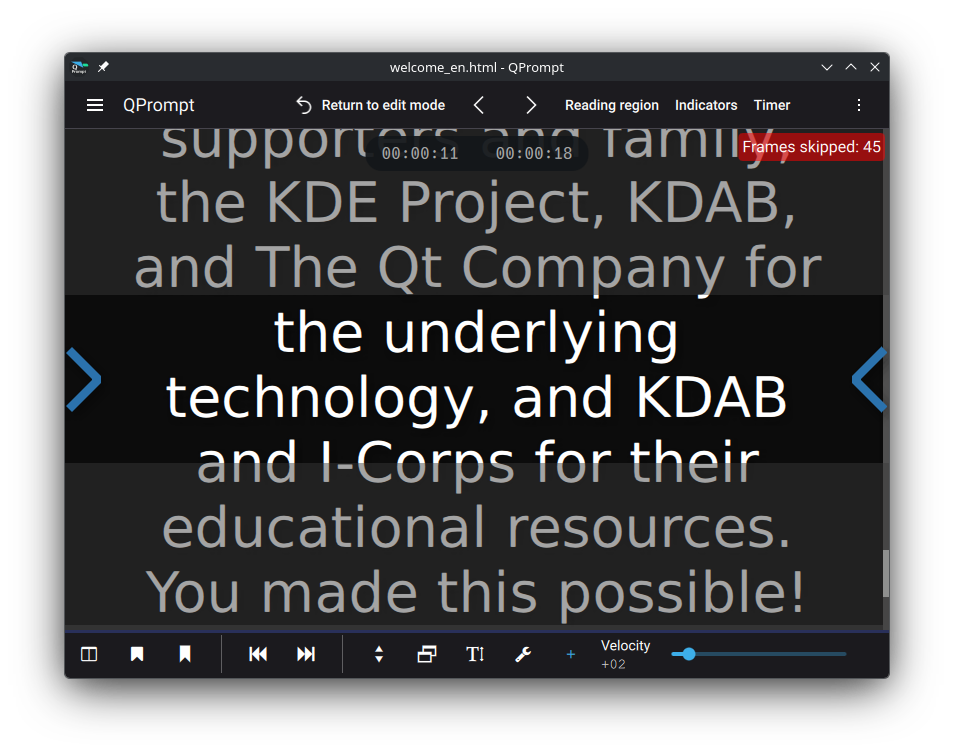
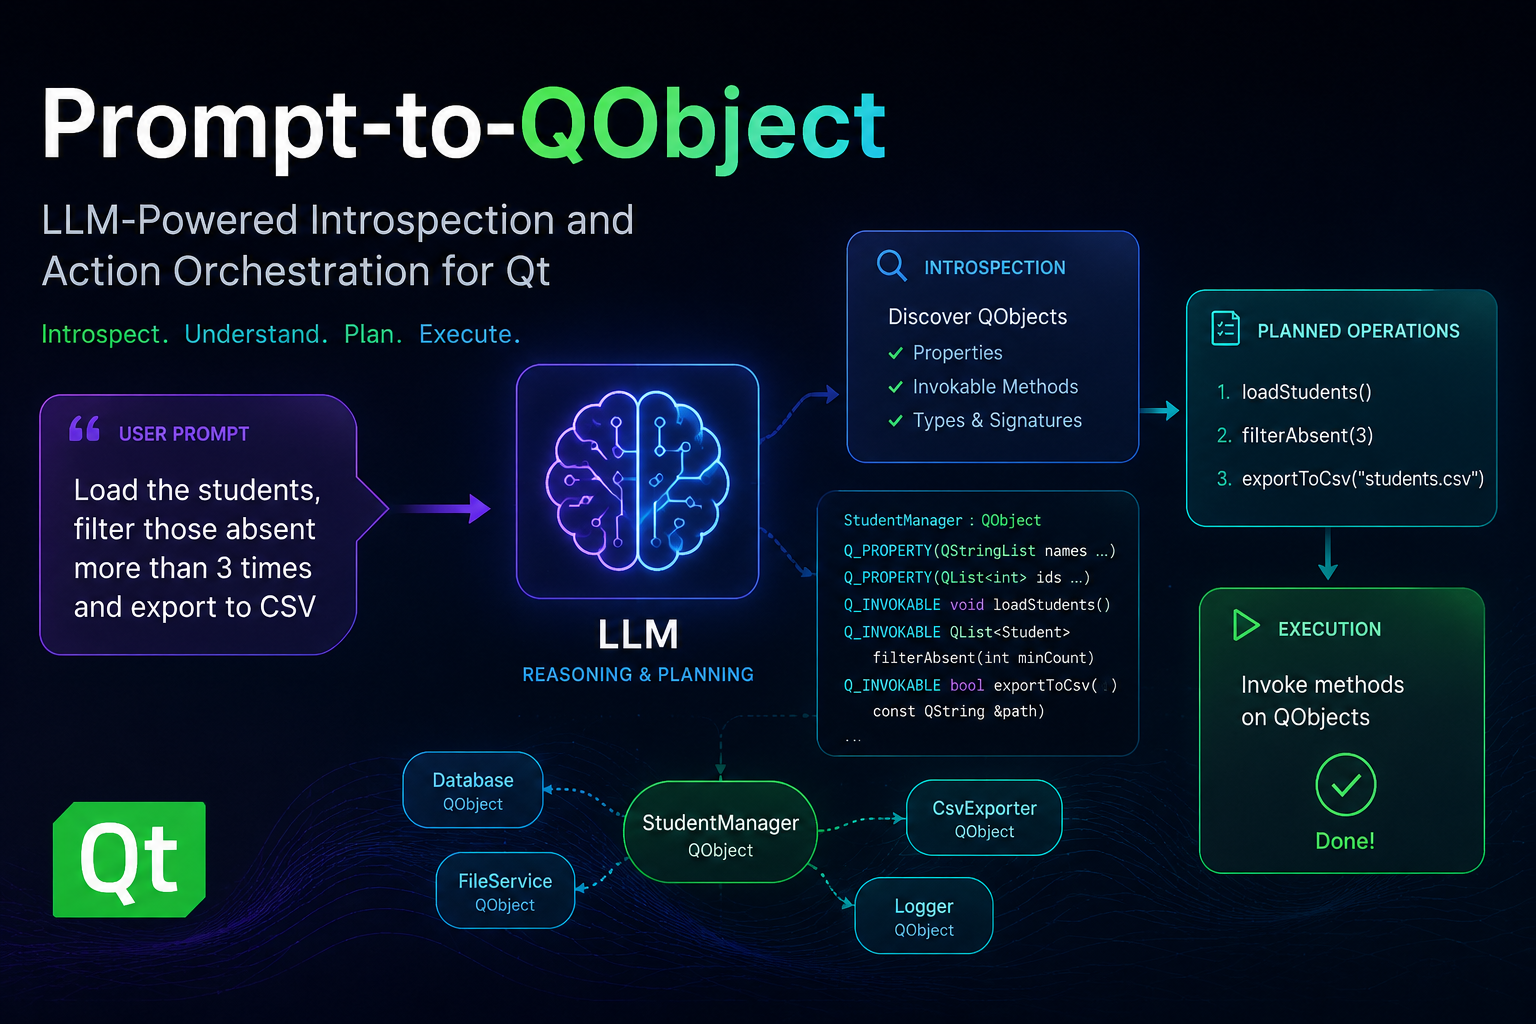
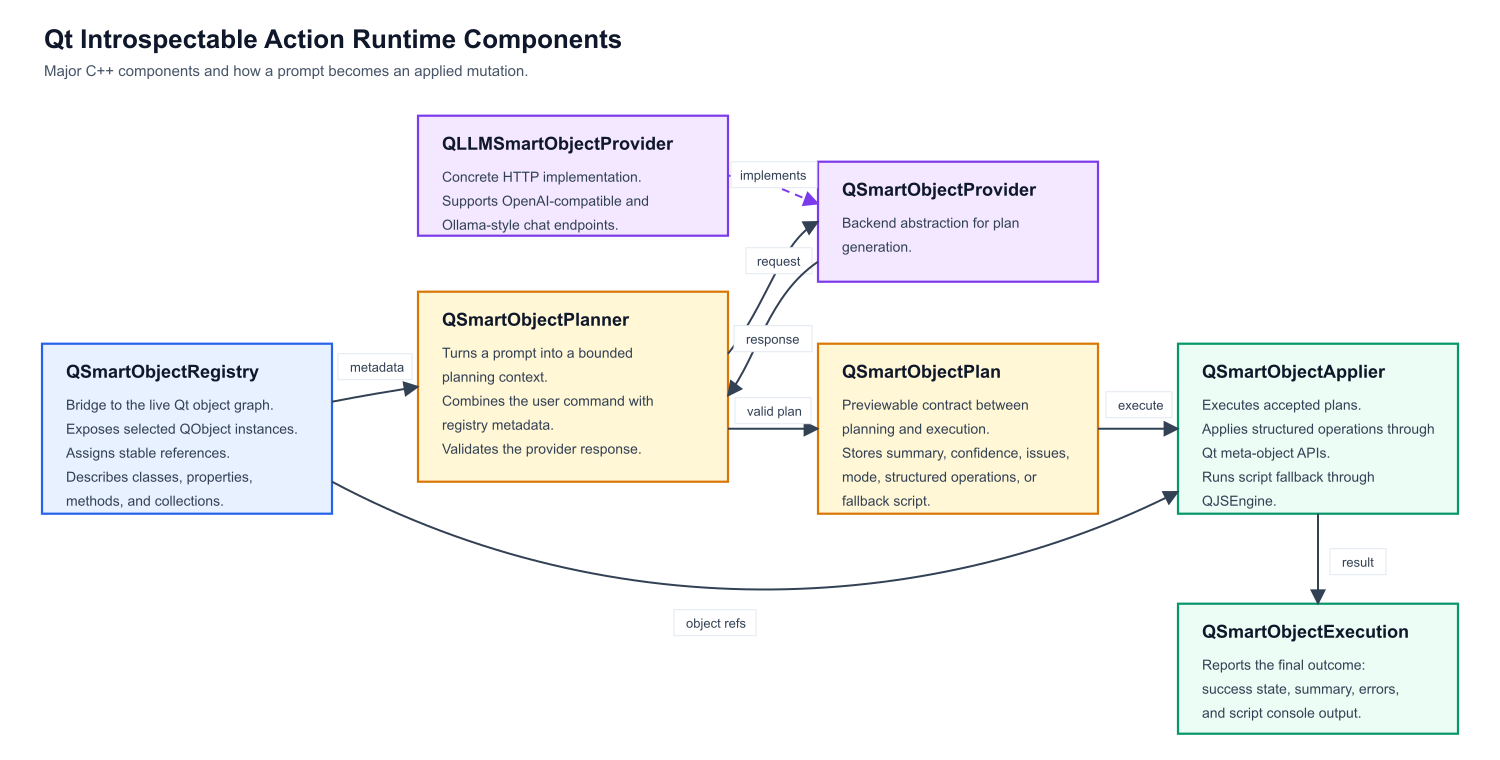 Figure 1:
 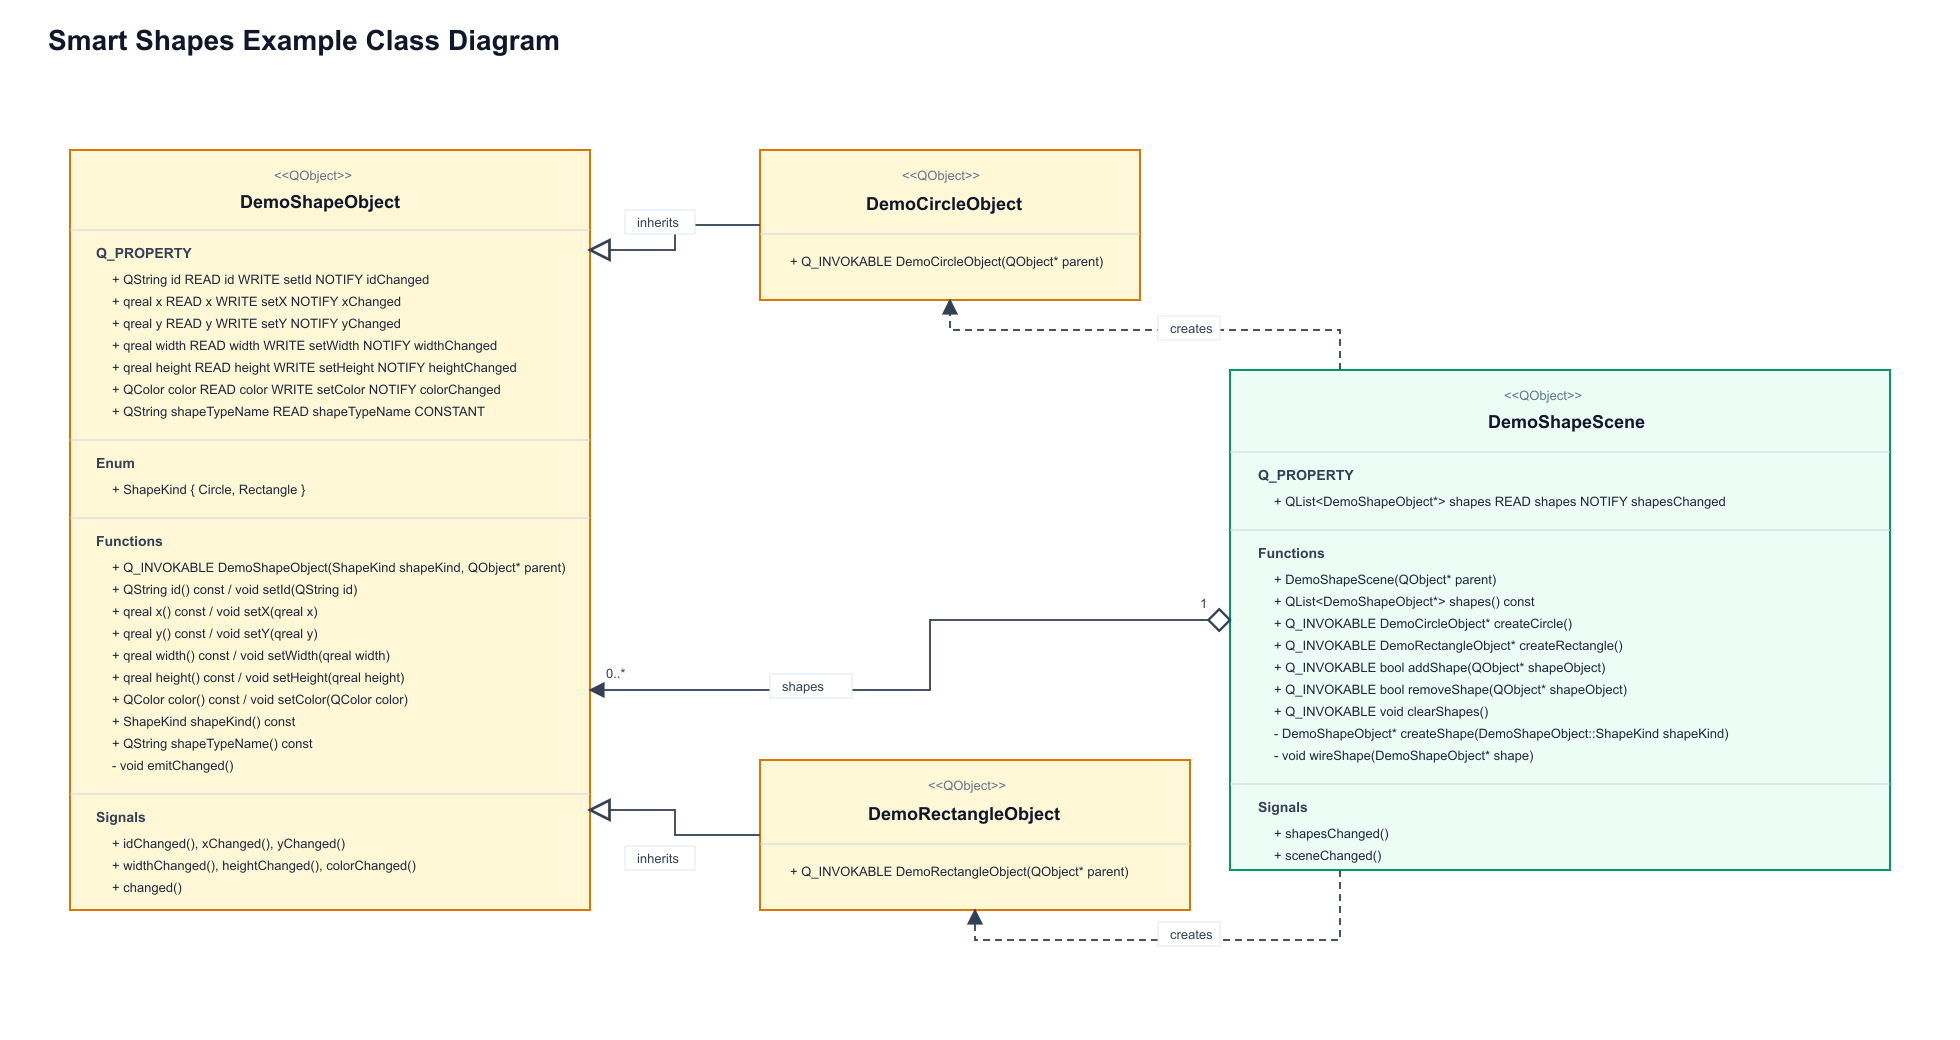 Figure 2:

 ) I had enough of a reason to finally sit down and implement this myself. The result: